Showing posts with label MS-OFFICE. Show all posts

Add Animated Charts to your PowerPoint Presentations


Microsoft PowerPoint offers a variety of charts and graphs that you can add to your presentations. These charts will mostly appear as static images on your slides though you can use PowerPoint’s built-in animation tools to add some movement and interactivity.
For instance, if you have have added a bar chart on one of you slides, you may apply custom animations to the chart such that each of the bars appear on screen with a fade or, say, a wipe. This support page has more details on how you can animate charts in PowerPoint.
Animated Charts Wizard
Animated charts, if done well, can help you grab the attention of your live audience. With PowerPoint, you can add some basic animations to your charts but the workflow is not as easy as you would like it to be.
If you are therefore looking for an alternate charting tool that’s more intuitive and one that can generate impressive animated charts but in considerable less amount of time, try oomfo.
Oomfo is a free plug-in that lets you create Adobe Flash based animated charts right inside your copy of Microsoft PowerPoint. It supports all the recent versions of Microsoft Office including Office 2010.
It uses a simple wizard – choose a chart type, type the data into the wizard (or you can copy-paste cells from Excel) and it will then insert the chart into your current PowerPoint slide as a Flash (SWF) object. You can place the chart anywhere on the slide or even resize it just like a regular image based chart.
What you see above is a video of a sample PowerPoint chart that was created using Oomfo.
The chart animation plays as soon as the slide appears on the screen and then you can use your mouse pointer to highlight the various data points, something which is not that easy to accomplish in standard PowerPoint.

Word Viewer: View, print and copy Word documents,

Most of the times it happens that you want to view/copy some selected text or Print the word documents but you might not have MS-Office Installed on your system. At that time yo might need this.  Spoon offers free service within web is called Word Viewer. Word Viewer is free for view, print, and copy word documents even if you don't have word installed. With Word Viewer and the Compatibility Pack, you can view, print, and copy document contents to another program.

How To Use This
Move to WordViewer
Once You open the above page you'll be asked to Install The spoon-plugin for You Browser
Download the spoon-plugin.exe and install this.
Then on the same page WordViewer Click the GREEN Round Button
This will take a few minutes to load the Word Viewer. Once the Word Viewer is Opened It'll ask you to select your destination Word file to be opened.
Open You Desired file, View Copy or Print as per your needs. This comes up with some limitation that you cannot edit an open document, save a document, or create a new document.

Universal File Converter: Convert any file file into any format with All Office Converter Platinum

Some people would like to convert PDF documents to Word documents so that they could edit them in Microsoft Word which they are familiar with. I've tried several free software but most of them don't convert properly, either the words appear corrupted, or the images don't align.
Here's a free software that gives one of the best output with the simplest procedure.
1) Start the software and click 'Add File', select your PDF file, click 'DOC' and finally 'Convert'.
     pdf to word
Source: The Simplest Computer Tricks Orignal post 
 2) Get your Word Document in C:\Output Files.
Here's a sample of the conversion from PDF to DOC.

Another feature worth mentioning is the ability to convert DOCX to DOC, PPTX to PPT etc.
DOCX is Microsoft Word 2007 document format and could not be open by older versions.
Download MS-Office Plugin to SAVE Ms-Office Files into PDF format

AbiWord 2.8.5: Word Processesing Software Like MS-Word

AbiWord 2.8.5
AbiWord is a free word processing program similar to Microsoft® Word. It is suitable for a wide variety of word processing tasks.
Features:
Multi PlatformEnjoy your favorite Word Processor on the operating system you like to use - be it Windows, Linux, QNX, FreeBSD or Solaris.

                InteroperabilityAbiWord is able to read and write all industry standard document types, such as OpenOffice.org documents, Microsoft Word documents, WordPerfect documents, Rich Text Format documents, HTML web pages. Advanced Document LayoutGive your document that professional, scientific or fun-to-read look using AbiWord's advanced document layout options. Use tables, bullets, lists, images, footnotes, endnotes and styles to enhance the way your document looks.
InternationalizationSince not everyone in the world speaks the same language, AbiWord comes in many different languages. AbiWord is available in most common and many not-so-common languages.
Mail MergeWith AbiWord's Mail Merge capabilities, you can let AbiWord automate that job for you. Special fields inserted into a template document can automatically be replaced with data coming from a variety of sources, such as Relational Databases, Comma Separated Text files or Tabbed Text files.
Extensible Plugin ArchitectureThe main AbiWord program is very small and requires very little resources to run. This allows AbiWord to be used on systems that are not considered "State of the Art" anymore, which comes all too quickly in the IT world.

What's New:
· Editing/Layout
· Fix German smart-quotes (Patrik Fimml)
· Bug 12552: fp_TextRun::itemize() leaks memory (Obin Hickory)
· Bug 12508: Prevent some crashes in recent-files code (Paul Bolle)
· Bug 12346: Pressing TAB removes text in the Windows version (Martin Sevior)
· Collaboration
· Support non-TLS connections for the abicollab service backend (Marc Maurer)
· GUI
· Bump the copyright date to 2010 (sum1)
· Bug 12551: Fix a memory leak in the menu code (Patrik Fimml)
· Windows
· Fix a potential crash in the Windows menu code (Marc Maurer)
· GTK+
· Bug 10377: Fix GTK+ landscape printing (again) (Patrik Fimml)
· Bug 12501: Fix GTK+ build to work without PATH_MAX (e.g. Hurd) (Patrik Fimml, sum1)
· Fix paths to the offline documentation (Patrik Fimml)
· Add an abiword(1) manpage and install it (Patrik Fimml)
· Restore/fix the AbiWidget focus grabbing behaviour (Daniel Drake)
· Prevent selection events to be emitted by the AbiWidget during smart quote operation (Martin Sevior)
· Maemo

Licence: Freeware

PowerPoint Viewer: View PowerPoint Presentations without MS-Office

Hello Readers:
Most of the times it happens you have to present some power point designed presentations to your audience but the PC available there doesn't have Microsoft Office Installed or it doesn't support your .pptx format slides. At that place what to do? Free Software Aisodvr is a platform to provide solutions to your problems. 
PowerPoint Viewer is a handy solution for your such problems. PowerPoint Viewer is such a handy tool that lets you to run/view your power point slides/presentations on your computer system either you have Ms-Office installed on it or not. It supports all the PowerPoint formats (from 97 to 2010). Either your have presentations in .ppt or .pptx format, PowerPoint Viewer allows you to view your full fledged presentations.
As it is only a viewer thus it only allows you to view your presentations but it doesn't support editing of the content. This viewer also supports opening password-protected Microsoft PowerPoint presentations.

Turn an Ordinary Mouse into Laser Pointer During Presentations

Hello Readers:
Microsoft Office 2010 is the latest release of Microsoft for the word processing. It has many useful options to make your documents, presentations more attractive and useful. Most of the presenters use a wireless laser pointer during their presentations to quickly point out the important points of their presentations.
Wireless mice is also a useful tool to change slides from a distance. Most of the wireless mice has a built-in laser pointer to point out the important points. Both of these options are very costly and every one is unable to afford any of these options.
Free Software Advisor platform brings a handy and a very simple tip for you to Turn your simple/ordinary mouse pointer into a laser pointer.

Turn Ordinary Mouse Pointer into Laser Pointer
Power Point 2010 provides its users to turn an ordinary mouse pointer into a cool looking Laser Pointer during their presentations. You need to launch your power point presentation in Microsoft Power Point 2010. Now start the Slide Show and press CTRL key and Press the Left Mouse Button (CTRL+LEFT Mouse Button)
You'll find this trick extremely handy and useful.
You Can Look at the Demo Below

Create Auto Table of Contents in MS-Word 2007/2010


Microsoft Office! one of the most used Word Processesing Suite in technology world. It allows you to create, manage your word processesing work more easily. It automates you each and every work of yours. Today at Free Software Advisor you'll learn: 
How To Create A table of Contents in MS-Word 2007/2010.
Yes! Microsoft Word gives us the option to automatically create the table of contents of our documents, books, research papers etc... created in Microsoft Word. Here Free Software Advisor will tell you the steps to create auto Table of Contents for your documents etc...
How to Create Auto Table of Contents in MS-Word...
Here I have created a sample document to teach you, How to create an automatic table of contents for your lengthy documents.
Step 1:
Prepare you own document in Microsoft Word.
Step 2:
 Now click on the red highlighted box (style arrow) to open the styles window.

Step 3:
Now assign the styles to your content. Give heading, subheadings styles to your text, as shown in the image below.

.................................................
..........................................................................

Step 4:
Now click on References tab and then click on the table of contents tab


Now right click on the Automatic Table of Content and select the suitable option where you want to put the table of contents. Usually it is always added at the beginning of the table.


Your Auto table of content is added to the beginning of your document.
 
Step 5:
If you already have added the page numbers to your document, then you can skip this step if you don't have added page numbers follow the following step shown in the image. 

MS-Excel: Change Columns to Rows Easily in few Mouse Clicks

Hello Reader:

Welcome again to Free Software Advisor. Some time it happens that we are working on some research or any tabular data. Most of use MS-Excel to deal with tabular data. Many time it happens that we have entered a huge amount of tabular data in Excel. But after getting half of the work completed we realize that it would be better if we have entered the data in row vise or vise-versa. It would be really difficult to change the rows into columns after entering large amount of numerical data. Today at Free Software Advisor you'll learn How to change the numerical data from rows to columns or vise-versa. 
Transpose option is mainly used for this purpose. This options changes rows to columns/ columns to rows. 

USING TRANSPOSE OPTION
I used my own created data for this picture tutorial of using transpose option. 
Now if we wish to change the above two rows into columns: Just select the cells you wish to convert. Copy these cells or Simply press Ctrl+C to copy the selected cells, as shown in the image below.
 Once you copied the cells; right click on the cell you wish to paste your data into rows and click Paste Special (and select the highlighted option in red box) That highlighted option is names as Transpose Option.
Once you selected the Transpose option, the above data shown in columns will be converted to Rows.
 Or if you have done the double click on the Paste Special Option the window similar to the window below will be opened. There click (check) the check box of Transpose.

Your column entered data will be arranged into rows without any trouble, tension and it ust takes a few mouse clicks.

Create Chemistry Equations and Diagrams in Ms-Word

Hello Readers:
No Doubt Microsoft Word is the worlds top leading word processesing software, and provides you the most effective and efficient tools for your text formatting. As earlier, on Free Software Advisor platform you learned about 

Today Software Advisor platform brings another especial tool for persons/students/teachers who deal with Chemistry, and prefer Microsoft Word for word processesing. Microsoft Research has recently released a new Ad-in  for word 2007-2010 to deal with chemical formulas and diagrams on the Microsoft Word platform. You easily can convert any Chemical name or formula into its Chemical Diagram, of standard name. You are a student, professor, or a professional chemist, This Chemistry add-in is an effective tool for you. Using this add-in you can easily bring chemistry to your computer. 

Download the Chemistry Add-in from the following link

Chemistry add-in

After downloading Install it on your system.  Run the following ChemistryAddinforWordBeta2.Setup 
After the installation you'll have the Chemistry tab on your Ms-Word ribbon 2010 as shown below.
(this tutorial is based on Ms-Word 2010)
Now Question arises How to use this add-in in Ms-Word?
Using Chemistry Add-in
Using Chemistry add-in is not a big issue, using this add-in you can insert an already created diagram from chemistry gallery to you documents.

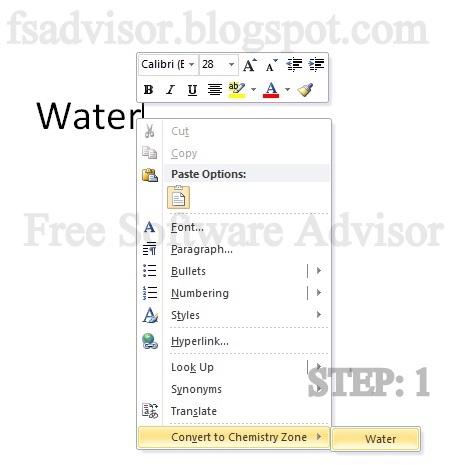
You also can convert any chemical name into it equivalent chemical form. All that you need to do is, simply make a right click on the word and select "Convert to Chemistry Zone" and then click on its name. as shown in image below.
Now if you click the Chemistry Navigator button as shown in image below. You'll see the chemical form  in the sidebar. There you can choose to insert diagram into the document. Some of the Chemicals will be automatically converted to the diagram, but some others may be linked to it in the side bar.

You can also convert a chemical name / formula to it equivalent diagram. Here I used Water(H2O) as an example.
First I converted it to Chemistry Zone. If you have written the H2O formula instead of Water, then by clicking on the Convert to Chemistry Zone, it'll automatically be converted to diagram, If its written water, then you'll need to follow the following step.

Once you have completed the step 1. Click on the View button as shown in the image below.


After Clicking on the view button a new popup window will be opened. There you can choose from any of the available representations of Water. For its Diagram you'll have to choose the 2D option, shown at the top of all available options.

Once you selected the 2D option. The word Water will be converted to its equivalent Chemical Diagram as shown in the image below.


Click To Download Chemistry Add-in

Decrease Ms-Office Auto Recover Interval

Hello Readers:
Office 2010 is one of the best Word Processesing Suite. It has many features, regarding the privacy of your documents, prevention from data loss and many more...
Auto Recovery is a very known and useful feature of Microsoft Office, with the help of which you can keep your data safe from being lost due to th system crash, power failure. This feature automatically saves a temporary based copy of your document at certain time intervals. By default this time interval is set to be 10 minutes. Which is a long duration. 
Today Free Software Advisor will tell you how you can easily  change the Auto Recovery time interval. This is useful if you are having problems like load shedding, power failure due to any other reason, system crash or any other problem. 
To guide you through the whole process I'll be using Microsoft Word 2010, but the same options tab can be found in all the Microsoft Office Applications:

Just Click on the FILE tab on the left upper corner of MS-Word 2010, or 
Office Button of Ms-Word 2007 and click Word options

File > Options


Click on the save tab shown in the left dialog box, and be sure to check the checkbox of "Save AutoRecover Information" as shown in the image below.
Here you can choose the time interval, how often you want Ms-Word to save a temporary copy of your document. 


My Words: 
Don't Choose too small interval, make it 2 or more minutes. Because with this 1 minute interval while working on the large documents it may slow down your computer. Because while working on the large documents and saving your documents every 1 minute will cost your computer in terms of slow processesing.

You Might Also Like:

Advance Typography in Microsoft Office 2010

Fonts can help your documents stand out and be easier to read, and Office 2010 helps you take your fonts even further with support for OpenType ligatures, stylistic sets, and more.  Here’s a quick look at these new font features in Office 2010.

To use the advance font features in Office Twenty Ten (2010). Open new document and type there some text and follow the steps shown below....

Once you clicked on the font as shown in the image above. Now choose the font named Gabriola as shown in the image below.
Now, Clack on the Advanced tab, to choose from different options in OpenType Features.
You can choose the Ligatures settings as shown below.


At the last Stylistic Sets for you fonts, The drop down button always shows options from 1-20. Mostly fonts include 1 or 2. Gabriola includes up to 7, You can choose 6 or 7.

Once you are done with all of these settings your typed text final face will be like this.
The font ligatures change based on context, so they will automatically change as the text is being typed.  Watch the transition as I typed the word Free Software Advisor in Ms-Word with Gabriola stylistic set 7.


Enjoy!

Let me know if you liked this post. Youe comments are precious for me.

Convert MS-WORD .docx to .doc

Hi Readers:
Earlier FS-Advisor told you about 
How to Make Password Protected MS-Office Confidential files
Ms-Office ADD-IN: Save as PDF or XPS
Today FS-Advisor will tell you a new tip to convert your MS-Word .docx files to .doc. Using this online tool you can easily convert your .docx files into .doc format with only 3 mouse clicks, within no time. And its free of cost. You can save your money from buying the paid converters.  Neither yo have to pay for it nor you'll have to give your e-mail id. This is 100% free of cost service and 100% secure.
The image above completely describes the process, How to convert .docx files into .doc format. In step 3 you need to click on the link to download your converted .doc file.
Click to convert

How to Make Password Protected MS-Office Confidential files

Hello Readers. Today FS-Advisor brings you a small but very informative tip. How you can make your MS-Office files password protective.
This is the latest and high level of protection offered by Microsoft for its valued users of Microsoft Office 2010.
You can assign password to your Ms-Office documents within no time. Without entering the set password no on can be able to view or edit your files. It is a safety measure provided by Microsoft to protect your confidential files and data from copying or editing.
1: File > INFO > PROTECT DOCUMENT > ENCRYPT WITH PASSWORD
Under the FILE tab click INFO and then click on PROTECT DOCUMENT. Move to the ENCRYPT WITH PASSWORD and click that option.


 A new window will be opened. enter you desired password. and there you are.
You document is fully protected. Now save your document and to reopen your document you'll have to enter a password.
Try this yourself....

Office 2010 beta: DOWNLOAD FREE


FS ADVISOR proudly presents a FREE download of MS-Office 2010 beta for you. Microsoft Office Twenty Ten (2010) Beta. This package allows you to do your work anywhere, in your own way, and with lot of ease. After Office 2007, Office 2010 beta is the latest word processing package, that allows the users to manage their office work more efficiently.
Office Twenty Ten is the most powerful tool that allows you to express your ideas, solve your problems and to easily manage your work load.
 It is the latest launch of Microsoft, and this beta package includes the following applications.

1. Microsoft Word.
2. Microsoft Power point.
3. Microsoft Outlook
4. Microsoft Excel.
5. Microsoft One Note.
6. Microsoft Access
7. Microsoft Info path
8. Microsoft Publisher
9. Microsoft Share point workspace
10. Microsoft Communicator


DOWNLOAD
OFFICE TWENTY-TEN (2010) Beta
Related Posts with Thumbnails