Showing posts with label BLOGGER. Show all posts

New Gadgets: Blogger Stats, Popular Posts

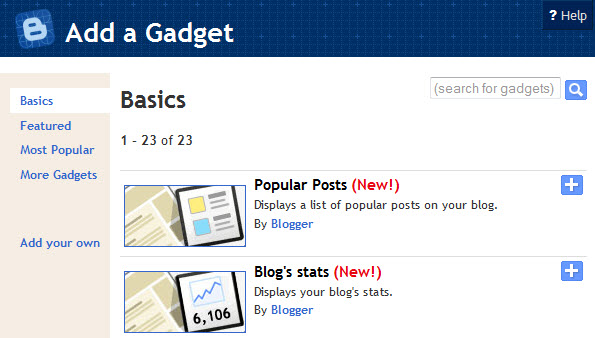
If you haven’t add any new gadget to your Blogger blog lately, then you have not seen the two newly added gadgets yet.  Blogger added two new gadgets that you can add to your blog to  show your readers stats from your blog: the Blog’s Stats and Popular Posts gadgets. 

Blog’s Stats Gadget

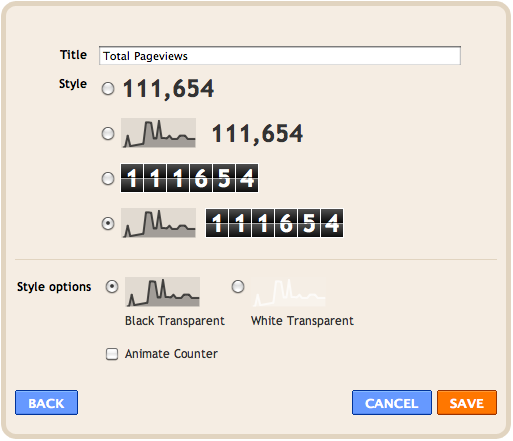
The Blog’s stats gadget displays total pageviews of your blog. The gadget comes in different styles and also features an optional sparkline graph.

Popular Posts Gadget

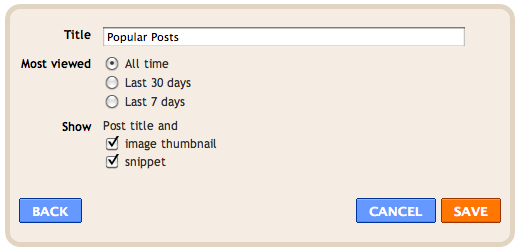
The Popular Posts gadget helps your readers quickly find out which of your posts have been viewed the most by your readers. The gadget also comes with several different styles and configurations.

How to create Table of Contents for your Blog

Many readers of my blog have asked me How we can create a Table of contents (Index page) for our Blog. This post I am writing is an answer to them.
It is very easy and a few steps process. Following these steps you easily can create a table of contents for your blog.
How To Create Table of Contents (Index) for Blog/Website
1:  Login to your Blogger Account
2:  Navigate to Designs > Edit HTML
3:  Check the check box
4:  Now Find the following piece of Code (Ctrl + F)
     <b:include data='post' name='post'/>
5:  Now Copy the following (red color) code and replace with the above (Blue color) code.  

<b:if cond='data:blog.homepageUrl != data:blog.url'> <b:if cond='data:blog.pageType != "item"'> <a expr:href='data:post.url'> <div style="padding:6px 0 6px 5px;border-right:1px solid #ccc;border-bottom:1px solid #ccc;margin-bottom:2px;background:#EAE9E9;color:#406A0E;"> <data:post.title/></div></a> <b:else/> <b:include data='post' name='post'/> </b:if> <b:else/>  <b:include data='post' name='post'/> </b:if>
6:  Now SAVE TEMPLATE and you are nearly 100% done.
7:  Navigate Designs < Add a gadget option 
8:  Select HTML/Java Script and add the following piece code there
<a href="http://YourBlogName.blogspot.com/search?max-results=200">Show all post »»</a> 

Display Your Own Favicon on Browser / Change Your Blogger Logo


This a very small (tiny) icon that is displayed along with your Blog/Website address  in the address bar of your Internet Browser. You may find this in every site you visit.  One must change this logo according to his own choice, Because when someone bookmarks your page, then rather than the default blogger logo, it will be your logo that is saved in their bookmarks. as shown in the image below.
I created my own favicon and displayed it on my blog, so that instead of the default blogger logo, users see my logo.
How to Set You Own Logo
You can create your own logos with favicon.cc and download this or create it with Photoshop or simply with Microsoft Paint. 
After your logo is ready for display, you have to upload it to some site. You may use ImageShack for uploading the picture. I personaly use Imageshack to upload images. Once you have uploaded the picture, you will get a link to that picture. Copy that link and save it in a text file.

1. Log-In to your blogger account. 
2. Navigate to "Layout>>Edit HTML".  
3. Search for the following code using "CTRL+F"
</head>
4. Copy the following code and paste this above the line (</head>) mentioned in step 3 

<link href='http://a.imageshack.us/img401/3610/animatedfaviconw.gif' rel='icon'/> 

4. Now you can replace the above link marked in red with your own favicon link.(one saved in your text file) Save your template and have a look at your blog now.

How To Add Featured Posts Gadget in you Blog


Hello Readers:
Featured Posts Option is just like a Headings in News Paper. This option gives a small introduction to the most important posts of your blog. Final Product will be looking like this.
You can add countless number of featured posts to your Featured Posts Gadget. This Gadget displays all the post (you want to be shown) after a regular interval of time. You can also change the time interval according to your needs, only if your are familiar with editing HTML codes.

How To Add Featured Posts Below Blog Header

1:  Just Go To blogger Layout > Page Elements and Click Add a Gadget as shown in image below. Select HTML/Java Scripts Gadget

(Click Here to Insert "Add a Gadget" Option below header if your Template does not contain such option)   

2:  Download The Code and Paste it in HTML/Java Script Gadget

3:  Make The necessary changes as described in the code and save. You have to just change the things highlighted in red color. This will add one Featured post only.


4:  If you want to add more post then Just before code  
     </div><!-- /featured-post -->
     add this code :


<div class="featured-item">
    <img alt="Image Name" width="304" src="Link of the Image" class="featured-thumb" height="190"/>
    <div class="post clearfix">
    <p class="date-post">Date of the Post </p>
    <h2 class="title"><a href="Link of the Post" title="Title of the post">Title of the post.</a></h2>
    <div class="entry">
    Post Content Or Description
    </div>
    <a class="read-more" href="Link of the Post" title="Continue Reading...">Continue Reading...</a>
<a class="Add to Your Blog" href="http://fsadvisor.blogspot.com/2010/07/how-to-add-featured-posts-gadget-in-you.html" title="Add to Your Blog">Add to Your Blog</a>
    </div>
    </div>


5. Repeat The step and Get as much post you want.

In The Same way keep On ading or editing all codes to show your Featured Post.
 

Insert "Add a Gadget' option below Header

Hello Readers:
This Post is all about explaining you guys to Insert "Add a Gadget" option in your blog below the blog Header (If already not). Blogging is fun, and playing with blogger codes is a recreation. By adding this option you can add any gadget below your blog header e.g. Featured Posts or any other...

How to Insert "Add a Gadget" Option Below Header

Note: Download Template as Backup
1:  Log-in to you blogger Account
2:  Move to Layout > Edit HTML 
3:  Check the check box "Expand Widget Templates"

4:  Now Find
Table 1
<b:section class='header' id='header-left' maxwidgets='1' showaddelement='no'>
<b:widget id='Header1' locked='true' title='YOUR BLOG NAME (Header)' type='Header'/>
</b:section>
 </div>
</div>
 You can find this piece of code below the <div id='header'>

5:  Copy and Paste the following (Table 2) code below the above (Table 1) code and Save Your Template

Table 2
<div id='footer4' style='width: 100%; float: right; margin:0; text-align: left;'>
<b:section class='footer-column' id='col4' preferred='yes' style='float:right;'/>
</div>

Insert "Recent Posts" Widget to Your Blog in 2 minutes


Hello Readers:
The most effective way to earn from a website/blog is by having a great number of visitors to your blog. The greater the visitors stay on your blog, the better will be your page rank in search engines.
What makes your visitor to stick to your blog/website.
1: Great Piece of writing in easy and simple words.
2: Adding the Recent Posts Widget to Blog will also help you to make your visitors stay on your blog.
I am writing this post to tell you how you can Add "Recent Posts" Widget to your blog. Follow these simple steps to install this widget on your blog.
You can Insert this widget to your blog by two ways
Method 1: Simple Add a Gadget (Beginners)
Method 2: Blend in template HTML code (Recommended / For Experts)
The Final Product will be looking like this

Method 1 (For Beginners)

1. Login to your blogger account and navigate to "Design>>Page Elements". Click on "Add a Gadget" and select "HTML/JavaScript".
2. Copy the following code and paste in the pop up window that appears.
<center>
<script language='javascript'>
imgr = new Array();
imgr[0] = &quot;http://i43.tinypic.com/orpg0m.jpg&quot;;
imgr[1] = &quot;http://i43.tinypic.com/orpg0m.jpg&quot;;
imgr[2] = &quot;http://i43.tinypic.com/orpg0m.jpg&quot;;
imgr[3] = &quot;http://i43.tinypic.com/orpg0m.jpg&quot;;
imgr[4] = &quot;http://i43.tinypic.com/orpg0m.jpg&quot;;
showRandomImg = true;
boxwidth = 298;
cellspacing = 8;
borderColor = &quot;#ffffff&quot;;
bgTD = &quot;#000000&quot;;
thumbwidth = 40;
thumbheight = 40;
fntsize = 12;
acolor = &quot;#666&quot;;
aBold = true;
icon = &quot; &quot;;
text = &quot;comments&quot;;
showPostDate = false;
summaryPost = 40;
summaryFontsize = 10;
summaryColor = &quot;#666&quot;;
icon2 = &quot; &quot;;
numposts = 5;
home_page = &quot;http://fsadvisor.blogspot.com/&quot;;
</script>
<script src='http://xrl.us/bhtuun' type='text/javascript'>
</script>
</center>
3:  Click Save

Method 2 (Recommended / For Experts)

Note:  Download Template as backup
1:  Login to your blogger account and navigate to "Design>>Edit HTML". Check the check-box "Expand Widgets Template "and 
2:  Find (Press CTRL+F) <data:post.body/>
3:  Below the above (Step 2) code paste the code given in Method 1.

Insert E-Mail Subscription Form Below Posts


This post is basically explaining the steps to insert e-mail subscription form below the post of your blog. This is a very simplified piece of HTML code with proper guidance. This e-mail subscription form will help your readers to easily subscribe to your blog. 
Final output will look like this one
 You can even change the color of the text box according to your blog color by changing rgb(100, 149, 237); from the Emial subscription code according to your desire.

How To Insert e-mail Subscription form Below Blog Posts

1:  Login to You Blogger Account
2:  Under the tab Design Click Edit HTML 
3:  Check the check box "Expand Templates Widgets"
4:  Find (Press CTRL+F to find <data:post.body/&gt;
5:  Now download the following code and copy/paste it below the <data:post.body/> (Step 4) piece of code. as show in the image below
Pink Highlighted code: Step 4
Blue Highlighted code: Step 5
6:  Replace the red color text with your feed name and blue color code with your Blog name
7:  Save! and ENJOY
8:  Preview your  blog template to check to check if there is any error in code. If you find errors, then repeat the whole procedure from step1 to last. 
If you have any problem in downloading the file or with the code, then please leave a comment.

How to Insert Adsense Ads Inside Blog Post

This post will be very helpful for those who are earning from the Adsense Revenue Program. In this post you will learn an AdSense trick which will allow you to put the ads inside your blog posts in any part of your post.Once Added you can place the ads anywhere in the post like after the first line of text, before the last line, in the middle..... and you can have the ads in different areas in every post.
By placing Adsense Ads inside your blog posts, you can have a positive change in your earnings. It will be more effective if you try to make the ad units blend-in with the rest of the content when your picking the colors.I have another post on how to add your Adsense Directly Below the Title of your posts
There is a bit of extra work in this tutorial but if you follow step by step you should have no problems also make sure to Back up your template.
How to Insert Adsense Ads inside Blogger Posts  
First you have to get the Adsense Code from your Adsense Account

  1. Go to your AdSense account and Choose what type of ad you want inside your blog posts.
  2. Grab the code for the AdSense unit.
  3. The AdSense code must be place in your blog templates html to do this we must use an adsense praser.
  4. Paste your Adsense Code inside and click make friendly.
  5. Your ADSENSE code is ready to use in template now.
 
Follow he following steps
  1. Log-in to blogger account
  2. Go to Design>Edit HTML
  3. Click "Expand Widget Templates"
  4. Find (Press CTRL + F) <data:post.body/>
  5. Now replace <data:post.body/> with the following

<div expr:id='"aim1"   data:post.id'></div> <div style="clear:both; margin:10px 0"> PUT YOUR PARSED ADSENSE CODE HERE </div> <div expr:id='"aim2"   data:post.id'> <data:post.body/> </div> <script type="text/javascript"> var obj0=document.getElementById("aim1<data:post.id/>"); var obj1=document.getElementById("aim2<data:post.id/>"); var s=obj1.innerHTML; var r=s.search(/\x3C!-- adsense --\x3E/igm); if(r>0) {obj0.innerHTML=s.substr(0,r);obj1.innerHTML=s.substr(r 16);} </script>

     7. Put your Adsense code where you see: PUT YOUR PARSED ADSENSE CODE HERE  
     8. Save your template - Were not finished....

Now you can make the Adsense Ad appear in any part of your blog post :


     9. When you writing your post place <!-- adsense --> in your post

So if you place the <!-- adsense --> tag at the top of your post the ad will appear there ...half way down ...near the bottom ...at the bottom...wherever you want it !

New Blogger Features - Share Icons - Video Player - Post Previews

Hello Readers:
Now a days blogging is no more unknown to anyone. Keeping this in mind blogger has recently introduced the new option of sharing the post on other platforms. These blogger sharing buttons include Google buzz, Twitter and Facebook and the most important an email button also. Now you'll not hvae to go and edit the complex code of your templates to add these sharing buttons to your blog posts.


Adding The New Sharing Buttons
 
These new sharing buttons can now be installed by going to the Design > Page Elements page of your blogger account. Click "edit" under Blog Posts widgets

check "show share buttons" to enable the buttons.

Buttons will be appeared under each post your blog readers will find it easy to share your post via email, Blogger, and popular social networks—Blogger currently supports Google Buzz, Twitter, and Facebook, and planning to add more services in the future.

I recommend you to add these social sharing buttons by your self, because this option would be lot more better if more sharing options were offered.However for new bloggers, who are reluctant to edit HTML codes of their blogger templates this option is quite helpful and easy.

Adding Videos To Posts

Now with new toolbar of Blogger you can attach videos in your posts by just one click. Before this the new toolbar of Blogger didn't allow its users to insert videos in their post, to insert videos they had to shift to the old blogger toolbar. Now this new toolbar has been updated to upload your video onto your blog 
By clicking on the video icon show in the above image a new window will be opened asking to browse your computer to upload your favorite video onto your blog. 

New Actual Like Post Preview


The Blogger has also updated the post preview option. This new option of Post preview allows you to preview your post in actual format. The older post preview was unable to give you a complete and actual preview of your post this option lies under the New Post Composer.

Add a Styling Three Cloumn Footer to Your Blog


It is pretty common that you might have seen all the professional blogger templates would possess a three column footer where in, they add details about their site or an about me widget and lots more. I recommend you to add this feature in your blog to make it more professional. You may scroll down the page to have a look at the bottom of the page to have a look at this widget which contains Popular Posts, Useful Resources, Blog Archive and Recent Comments.
Hope, you got an idea about what a three column footer is.
Adding Three Column Footer

To add this stylish three column footer to your blog, just follow these simple steps. As we always ensure safety, the first step would be to back up your template. To do this, simply navigate to "Design->Edit HTML and make a backup of your template clicking on the "Download full template" link at the top of the page. Once the back up is over, follow these simple steps.


1. Search for the following text in your blogger template. To fasten your search, use "CTRL+F".
]]></b:skin>
2. Download the following text document : Three Column Footer One. Just paste the code in the document above the line mentioned in step 2.
3. Search your template for the following text.
</body>
4. Paste the following piece of code above it.
<div id='footer-wrapper'>
<div id='lower-wrapper'>
<div id='lowerbar-wrapper'>
<b:section class='lowerbar' id='lowerbar1' preferred='yes'>
</b:section>
</div>
<div id='lowerbar-wrapper'>
<b:section class='lowerbar' id='lowerbar2' preferred='yes'>
</b:section>
</div>
<div id='lowerbar-wrapper'>
<b:section class='lowerbar' id='lowerbar3' preferred='yes'>
</b:section>
</div>
<div style='clear: both;'/>
</div> </div>
(Note: You may paste the above code in the place where you want the footer to appear. It is ideal to place this section before the credits section in your blog.)
5. Now, save your template and your ready with the footer section. Add any widget you want. Feel free to comment or contact me  for any assistance that you need to install this feature. I would be happy to help you!! See you soon in my next post!!!
Thanks to EAB

Blogger Update: Ned Default Sharing Buttons

Hello Readers:
Now a days blogging is no more unknown to anyone. Keeping this in mind blogger has recently introduced the new option of sharing the post on other platforms. These blogger sharing buttons include Google buzz, Twitter and Facebook and the most important an email button also. Now you'll not hvae to go and edit the complex code of your templates to add these sharing buttons to your blog posts. 

Adding The New Sharing Buttons
These new sharing buttons can now be installed by going to the Design > Page Elements page of your blogger account. Click "edit" under Blog Posts widgets


check "show share buttons" to enable the buttons.

Buttons will be appeared under each post your blog readers will find it easy to share your post via email, Blogger, and popular social networks—Blogger currently supports Google Buzz, Twitter, and Facebook, and planning to add more services in the future.

I recommend you to add these social sharing buttons by your self, because this option would be lot more better if more sharing options were offered.However for new bloggers, who are reluctant to edit HTML codes of their blogger templates this option is quite helpful and easy.

Insert Animated (close-able) Notice Box in Blogger Widget

Hello Readers:
Have you ever wanted to greet your visitor with something important message? or want to have your visitor a look at the most important content of your website. 
Than an Animated Notice Box (close-able)  blogger widget is the solution for your problem. 

Adding   Animated (close-able) Notice Blogger Widget
To Show The Notice Box Above/Below Blogger Post
1:  Log-in to your Blogger Account
2:  Go to Design > dit HTML
3:  Check the check-box "Expand Widget Templates"
4:  Press CTRL + F to find <p><data:post.body/></p>
5:  Copy the following Code and paste above/below the code to show the notice box above/below the post (Step 4)

<style>
info{
        border: 1px solid;
        margin: 10px 0px;
        padding:15px 10px 15px 50px;
        background-repeat: no-repeat;
        background-position: 10px center;
        position:relative;
        color: 00529B;
        background-color: BDE5F8;
        background-image: url(&39;http://i46.tinypic.com/jzf8tk.jpg');
    }
</style><script src="http://code.jquery.com/jquery-1.2.3.min.js" type="text/javascript">
</script>

<script type="text/javascript">
        $(document).ready(function(){
    $(".close").click(function(){
        $("#info").animate({left:" =10px"}).animate({left:"-5000px"});
    });
    $("#info").fadeOut(800).fadeIn(800).fadeOut(400).fadeIn(400)
    .fadeOut(400).fadeIn(400);
});
  
</script>
<div id="info">
<a class="close" href="#close" style="float: right;"><img border="0" src="http://i48.tinypic.com/3502jif.jpg" /></a>
This Is Your Message .You can change it to Your need.
</div>

6:  Change the Red color Text with your desired Message you want to show your viewers
If you want to show this Animated (close-able) Notice Box in Blogger Widgets 

1:  Go to Design >Page Elements 
2:  Click on Add a Gadget and Select HTML?Java Script gadget.
3:  Copy the code shown in Scroll box and paste in HTML?Java Script Gadget and ENJOY!

Add Social Bookmarks (RSS, F.B and Twitter) to your BLOG


Blogging is fun and playing with HTML is fun. Today at Free Software Advisor Platform you'll learn how can easily place social bookmarking buttons for your viewers. Placing the social bookmarking options will help your blog viewers to be updated with your blog without visiting your page. This will increase your blog/website traffic.

Adding Social Bookmarks + E-mail subscription Option
This tutorial is for blogger.
1:  Log-in to your blogger account. Move to Layout
2:  Click on Add a Gadget tab and there select HTML/Java Script
3:  Now copy the code below and paste in HTML/Java Script gadget


<div id='socialbookmark'/>
<ul>
<a href='http://feeds.feedburner.com/Your Feed URL' target="_blank">
<img alt="RSS Link" src="https://blogger.googleusercontent.com/img/b/R29vZ2xl/AVvXsEjVNmTA9O3u_Npx4FwKwVlE1C-fC2oJtYYjHIcvlfti_fYh12ZnwGlJRMk3nJm3t23B8EeS2-UNnrmI4vqD6wcM3qVZbTEnH_5U2AzTtkEZMS1EyNA40OGtu-3FvCEACoA_cqQwVhLK9iPQ/s400/rss.png" /></a>
<a href='http://www.facebook.com/Your Facebook URL' target="_blank"><img alt="Facebook Link" src="https://blogger.googleusercontent.com/img/b/R29vZ2xl/AVvXsEhyHiMhd84MOGDzKCRYNnSMBfEFvJaO-CzQVUKwMmV3TYnjjKq2mtNHHNCyw5GKGN7CcUHs7N0LBaojla6FZNc2m72DzCGMsJTr9abF9aWIfm1yjg265aenfdfVClxoCWECyLLvIJO-0M8U/s400/facebook.png" /></a>
<a href='http://twitter.com/Your Twitter User Name' target="_blank"><img alt="Twitter Link" src="https://blogger.googleusercontent.com/img/b/R29vZ2xl/AVvXsEiDAxqJeggLMTmKXPgldnNZgfWEqXisnj7_VXTU4ki8u_jeFuE-0T2lHJSSAB6zaDjtIYq8wwPoTnMVbdZ53rT2kJRHp6QneCFE5plqu6EJr4iRr32x5uKwVuJZqmN6ilohQCzTLQJVx8zb/s400/twitter.png" style="border:0;" /></a>
</ul>
<br />

4:  Replace the Red, Blue and Pink codes with respective URLS
5:  Save Gadget and ENJOY

How to Add a Scroll box inside Blogger Posts

Many of the new bloggers want to know how to make scrollable box or scroll down box  inside their blog posts. This can help you to reduce the space covered by the post content, especially if you are inserting a long long piece of HTML/Java codes inside your post, it requires a lot of space. But adding your code inside the scroll box will not cover the space of your page. To see how you can insert scroll box inside posts surf over to this post.
Adding Scroll Box inside Blog Posts
Copy the following code and paste inside your blog post as it is.
<div style="overflow:auto; height:300px; width:400px">
<table cellpadding="0" cellspacing="0" style="width:250px;">
<tr>
<td>Put your stuff here</td>
</tr>
</table>
</div>

Customize

1:  To change the width / height of your scroll box change the numbers in blue as per your needs
2:  Put the material you want to be appeared in the scroll box instead of "Put your stuff here" in RED

To have a look on sample scroll box in blog posts click here

Create Your Own Logos for Blogs/Websites etc... free

Hello Readers:
Do you want to create your own customized logos for website/blog or to use it any where else you want. Cool Text is a free graphics generator for web pages and anywhere else you need an impressive logo without a lot of design work.  Simply choose what kind of image you would like.  Then fill out a form and you'll have your own custom image created on the fly.
Cool Text is the
worlds most popular graphics generator.  
Creating a Free Logo
Log-on to Cool Text and choose any of the given logo styles.

Once you have selected your favorite style. You can design you logo according to your requirements. You can change the font style, select the font color from variety of colors. You can also change the font size.
Once you are done with the customization, you can click on the red encircled button 'Render Logo'. You will be redirected to a new page. Where you'll see your final logo and you will be able to download your logo or you can choose other options too. as shown in the image below
Here are some sample logo designs....

Add LinkList As Horizontal Top Menu Links For Blogger


Hello Readers:
It took me a lot of days to learn about how can I add a linklist above my Blog title to make my blog readers fing the article; they want, more easily. Today I found a way to add linklist above the Blog header. I would like to share this Blogger Hack code with you.
Adding Lisnklist as Top Menu Links Above Blogger Title
This tutorial is to add top menu links. The link list widget will be added in your blogger layout above your blogger header (at the top of your blog) from where you can easily add your horizontal links and manage them as per your needs and there will be no need to go to html of your blog every time to manage these horizontal Links. This will enable you to manage links just from Lavout>Page Elements page.
1:  Log-in to your blogger account. Move to Layout>Edit HTML
2:  Check the Check-box "Expand Widget Templates"
3:  Press CTRL+F and find </b:skin>
4:  Now copy and paste the following code above </b:skin>
/* ----- LINKBAR ----- */
#linkbar {
margin: 6px 0px 0px 0px;
padding: 0px 0px 0px 0px;
width: 100%;
position: relative;
background: #000;
border: 1px solid #000;
border-bottom: 0;
}

#linkbar ul {
margin: 0px 0px 0px 0px;
padding: 5px 5px 7px 5px;
text-align: left;
list-style-type:none;
}

#linkbar li {
display: inline;
margin: 0px 0px 0px 0px;
padding: 0px 0px 0px 0px;
}

#linkbar h2 {
margin: 0px 0px 0px 0px;
padding: 0px 0px 0px 0px;
display: none;
visibility: hidden;
}

#linkbar a {
clear: both;
margin: 0px -4px 0px 0px;
padding: 3px 20px 3px 20px;
width:100%;
text-decoration:none;
font-family: arial, sans-serif;
font-weight: bold;
font-size: 12px;
color: #fff;
border-right: 1px solid #fff;
}

#linkbar a:hover {
color: #000;
background: #fff;
}
5:  Now (CTRL+F) search for this code <div id='header-wrapper'>
     If not found try ti find this <div id='header-left'>
 6:  Now Copy the code below and paste above the code searches in step 5
<div id='linkbar-wrapper'>
<b:section class='linkbar' id='linkbar' showaddelement='no'>
<b:widget id='LinkList1' locked='true' title='Linkbar' type='LinkList'>
<b:includable id='main'>

<b:if cond='data:title'><h2><data:title/></h2></b:if>
<div class='widget-content'>
<ul>
<b:loop values='data:links' var='link'>
<li><a expr:href='data:link.target'><data:link.name/></a></li>
</b:loop>
</ul>

</div>
</b:includable>
</b:widget>
</b:section>
</div>
That's It
Now Goto Page elements and you will see an gadget named linkbar in your blogger layout below the header of you blog,click the Edit Button On that gadget an window will open and add the link you want to show up in your blog top menu from there and can manage all menu links from there .Its so easy,i hope will like this tutorial.
CUSTOMIZE:


If you want to add the Link list below your Blog Header Just paste the code (step 6) below the code searched in step 5.
Related Posts with Thumbnails